Showing posts with label quilting. Show all posts

Wednesday, 31 May 2017

'Sew Happy' Quilt

I decided to have a tidy up of my craft room just recently which really just morphed into a clean out session.  This involved going through a lot of my dressmaking fabrics, samples, off-cuts and fat quarters and I came across so many remnants that the creator in me just knew they couldn't be thrown away for fear of it being considered criminal.  So I came up with the idea of making myself a new sewing machine table quilt from these remnants.  The current table cover was an old tablecloth which really had seen better days so between other projects and market preparations, etc. I set about creating a small quilt just for me and just for my creative space.  I figured it would also help hone my quilting skills. The basic criteria though was to use as much of these remnants as possible to free up valuable storage space (for more fabric...yeah I know....go figure that logic) and to create a project that would bring back memories of what the fabrics had once been sewn for.  


The size of the quilt was really based on the amount of fabric I had and to cover the wooden table adequately as the top is old and a little bit chipped but still quite sturdy.  The blocks were based on the railroad design and even though I didn't worry too much about matching colours and patterns for each block I did take into account the overall effect so some fabrics were used in multiple blocks. 


With the short strips that were left over and not stitched into a block I decided to use as a border around the perimeter.  This really helped use up so many small pieces of fabric and once again they were added in no particular order but placed around the blocks to evenly distribute the colours.   


For the backing once again I recycled.  Recently my son updated his room with a new paint job and curtains.  The backing of the old curtains were still perfect so I used one and sewed some larger pieces of remnant fabric on it ... just for the heck of it .... by using the buttonhole stitch on my sewing machine. 

I opted for inexpensive polar fleece for batting and then began the task of quilting all layers together using a diagonal stitch across the whole quilt and then stitching around each block. The effect can easily be seen on the photos below and above.


Binding used up more scrap fabric and then the all important naming of my sewing table quilt - 'Sew Happy' - which to me represented all the years of sewing I've done either making clothes for myself or my children, craft items or quilts and the happiness I've derived from being creative and developing such a sense of achievement.

My Sew Happy quilt is now proudly spread on my sewing table with my sewing machine placed on top and will be a constant reminder of all my past sewing projects.

Ros

'Happiness is a perfume you cannot pour onto others without getting a few drops on yourself' - Ralph Waldo Emerson

Monday, 28 March 2016

The Goodbye Cushion

The neighbours that live across the road from us are selling their family house and downsizing by moving into a smaller and more easily maintainable unit.  Consequently for the past few months they have had the arduous task of cleaning out 30 years worth of 'stuff' that is no longer needed with some items going to Lifeline, some being sold at a garage sale and a lot just thrown in the rubbish bin.  I was fortunate to be given some fiction and non-fiction books and fabric lengths but best of all a tangled mess of stranded and perle threads, ribbon embroidery threads and lace which I happily sorted one Friday night and spooled onto cards whilst watching a favourite movie on TV (mmm...that's how exciting my Friday nights are these days).  Anyhow, amongst the fabrics were cut out pieces (shown below) - some already partially embroidered and beaded - that apparently were initially meant to be made into a stuffed teddy bear for her three daughters when they were young.  With time constraints, lack of motivation and inclination over time, they were all but forgotten about until the big clean out and my neighbour (knowing that I was crafty inclined) thought I might be able to use them.  Well...was she right about that!!


However, it wasn't until I took a closer look at them that I realised the huge amount of work that had already gone into these pieces and felt that I shouldn't really be accepting this when she had done so much herself and it was then that I decided to create a goodbye gift for her.  My first thoughts when studying it was what a beautiful crazy quilted piece they would make and so I set myself the task of making them into a cushion.  

First I carefully washed the pieces individually to eliminate the musty smell of sitting in the back of a cupboard for so long before grouping the colours to work out how many pieces could be used according to their shape and embroidery keeping in mind to distribute the colours evenly for both sides.  Two pieces of calico were cut to a pre-determined size and both sides of the cushion were worked at the same time ensuring there would be an even amount of fabric pieces to cover both sides.  I was really surprised how after trimming to straighten the edges of each piece that the overall size needed to be decreased so it turned out to be a wise decision.  Where the off-cuts had beads, I kept these for use later on.


These photos show the almost completed patchwork for both sides and highlights the use of the embroidered and beaded pieces. 

Once all the patchwork was done, time was then devoted to embellishing the seams and/or any bare sections with either embroidery, beading or any other interesting form of embellishment.  My two main criteria right from the very beginning were to use as much of my neighbour's threads, beads, ribbons and lace and to also enhance her work by copying the stitches she had already used as much as possible so there wasn't a definite and obvious distinction between her work and mine.   Her use of basic stitches - herringbone, lazy daisy, feather, etc. - set a good starting point for me and these were incorporated as well as using some of my own.

After completing an intense 6-7 weeks of constantly working on the project at every possible opportunity, the cushion was bound with fabric (a piece that was given to me by her) and the insert sewn into the cushion before being slip-stitched by hand.  


One completed side of the cushion...


... and the other.

... and just a couple of close-ups.


I took the cushion to my neighbour last Wednesday and the emotional tears and impromptu grateful hug told me her true feelings of this gift.  

I will miss her and her family when they move on as she has been a wonderful friend over the almost 28 years that we have lived here.  We've had fun conversations, shared happy occasions like weddings and births of grandchildren (hers not mine), supported each other during sad times and given friendly waves to each other when in the yard watering our gardens.  I wish her and her husband much happiness and good health in the next phase of their lives.

Ros 

'Friendship and support from friends is something which is a source of tremendous inspiration always and to everyone' - Nelson Mandela


Thursday, 8 October 2015

Quilted Case Rules

On a whim a couple of weeks ago I decided to sew a quilted case for my quilting rulers to protect the corners from damage and the possibility of them being accidentally broken or cracked.  It occurred to me that it would be a great way to use up left-over fabric scraps in my stash (of which I have plenty) and a resourceful way to de-clutter.  Cleaning out the pillow-case of scraps brought back wonderful memories of garments that had been made for my daughter when she was very young and even some of my own clothes along with crafts from more recent years so this project really became a collection of memories.  

Firstly I measured a layout of the size and shape that would be needed onto brown paper and then set about blending and sewing the fabrics so the plain and floral colours would be evenly distributed. This was painstakingly done row by row and also in accordance with how much fabric was available for each colour.  The length of each strip in each row was staggered for a brick-like effect.  


But, of course, once the strips were sewn together, the embroiderer in me realised that it could do with a 'bit' of texture and interest here and there which, of course then led to perhaps a 'bit of bling' here and there which then led to filling each plain coloured fabric strip with some form of embroidery and/or beading or sequins.  I'll admit it, I confess ... I was obsessed ... but you see once I had started and could see how beautiful it was looking with just simple embroidery stitches ... alas, I could not stop.


By incorporating simple embroidery stitches of chain, stem, lazy daisy, star, straight, feather, blanket and french knots together with brightly coloured sequins, bugle, seed and pearl beads, it created an incredibly interesting work of art.  Because there was so much bright colour in the fabrics, I decided to only use white stranded cotton and thicker crochet cotton for contrast.  You can see by the above photograph that the edges of the strips were all of a slightly different length but would be neatly cut to the measured size as seen in the photograph below after it had been quilted with contrast fabric and wadding.  I decided to just quilt along the seam of the long strips and not the shorter seams of each strip as I felt this gave enough of an effect without becoming too tedious.


Once this stage had been reached, the blue binding was sewn and slip-stitched into place across the longer top edge before then folding the entire case into shape.


Once this was done blue binding was then sewn and slip stitched into place from the lower folded section through all thickness of front and back, around the overflap and back down the other side.


 A couple of press studs were then hand stitched on the flap and front of the case to ensure the rulers don't move and/or slip out.


This is the back closed view...


and this is the back open view.  After completion, I decided to carefully add a few more sequins on the red section and another backstitched star with seed bead on the black strip as they were on the front flap and 'front and centre' of the project.

I absolutely loved working on this project.  Who would have thought that left-over scraps of fabric, a little imagination and simple embroidery could create something so useful.

Ros

'The difference between try and triumph is just a little umph' - Marvin Phillips


Monday, 27 July 2015

The Finished Quilt

A little while back I posted about a new skill I was learning - quilting and promised to share photos of my finished project.  It is only just now that I realise that I forgot to take photos of the progress of the quilt construction so you will just have to bear with me while I explain the process and use the image below to refer to.  

Once all the blocks had been completed, it was necessary to choose contrasting fabrics for sashings and posts which are placed around each block and used to join these blocks together.  On my quilt you will see I chose the red fabric as a highlight for the posts and purchased a more subtly patterned fabric for the sashings.  After deciding on the placement of each block which required laying out each block and then moving them around to achieve a layout whereby the colours and patterns were evenly distributed, it was then a case of systematically sewing the fabrics together in order of rows and then joining these rows together all the time being careful to match seams and keep everything straight.

After that came the task of cutting the border which involved quite precise measuring because as our teacher explained sometimes the length of the top and bottom and both sides of a finished piece of patchwork can be uneven no matter how careful the seam allowances were sewn.  So it was important to measure in three places (top, bottom and centre for the length and left side, right side and centre for the width) and use the average measurement to cut the lengths of border.  The side borders were sewn to the patchwork first before the top and bottom borders.  It was at this point while we had our fabric and rotary cutter on hand that we cut out strips for binding and were shown how to neatly join these lengths of strips together which was very easy.  This was then put away for use at the end of the project.

The following week we were taught how to lay our backing fabric (which was yet another piece of fabric purchased) face down on the work table, place the cotton wadding over top and then final placement of our 'work of art' on top.  We all worked together on each other's quilt because it was so important that when each layer was placed on top of the other, that it was gently and accurately placed to ensure evenness with no stretching or warping and straightness was maintained.  After securely attaching all three layers to the work table with the most high-tech of devices (bull-dog clips!), we all set to the task of pinning the layers together at close intervals but not on any seams.  Pinning four quilts together took up the entire lesson but it was a most enjoyable time for us all to chat about all sorts of topics.

The following week, we were taught the technique of 'stitching in the ditch' which really is just a quilting term for stitching in the seam allowance on the lower side.  We were also shown the correct way of securing and bringing the bobbin thread to the top of the quilt so the back of the quilt was smooth with no cut off threads and whilst it took us all a little while to master this technique, it was worth it for a beautiful and professional finish.  In order to keep the quilt flat and stable and prevent any possible warping, we were also advised on the order of stiching seams ie. the inside sashing borders first, then the outside before sewing the individual blocks.  All of my blocks were sewn in the ditch to reflect the pattern on the back so I'll admit it was a long process and required patience.  The quilt needed to be rolled carefully around the sewing machine when working in an area which was quite tight, but once I could see it coming together, it was inspiration for me to keep going albeit in stages.

The following and last week of our classes involved squaring and cutting the borders evenly and attaching the binding to the edge.  Our teacher was very implicit with the technique on how to mitre the corners to give a perfectly rounded point and instructed us on a clever technique to join the ends together so the binding appeared seamless and not bulky.  It was then just a matter of folding the binding to the wrong side and handstitching a slip stitch into place to cover the machine stitching and, for me, this was enjoyably done while watching television and listening to the rain or howling wind outside.  


My quilt now has pride of place displayed over a cream upholstered chair in our lounge room and I am so happy with my efforts and the finished effect that I often look and touch it lovingly when no-one is around (sshhh...don't tell anyone).  

I am also proud to say that I have already started my next quilting project which consists of log cabin blocks in very bright colours.  But I'll leave that story for another post.

Ros

'Great works are performed not by strength but by perseverance' - Samuel Johnson

Sunday, 31 May 2015

A New Skill

For some time now I have been wanting to learn to quilt partly because I was keen to expand my skills but more recently I have been so inspired by the absolutely beautiful work that some of the ladies at our monthly Guild stitching afternoons do with hand embroidered blocks which are then included in larger quilts.  So, on good advice by one of the ladies who lives close by I signed myself up to do a beginner's course at our local quilting shop and bought all the necessary equipment ie. a 1/4" foot for the sewing machine, cutting mat, ruler and a rotary cutter.  The owner of the shop kindly helped and guided me with choosing a selection of 6 fabrics and explained how and why a variety of blending and contrasting colours are needed.  So with sewing machine dusted off and a pencil and folder for hand-outs, I prepared for my first lesson.

The first part of the the first class concentrated on the basics such as safe use of the rotary cutter and its use with the ruler, fabric grains, how to straighten, square and cut fabric, pressing tips and the importance of using the 1/4" seam allowance measurement to ensure precise joining when sewing all seams together so they align perfectly.


The block on the left - called simply a 9 piece block - was our very first attempt and as you can see consisted of just small squares to make a large square, but this gave us a good introduction into choice of fabrics and how placement can give totally different effects.  We were also taught the importance of order in which to sew the individual squares and then row by row and that by doing it that way it eliminated any chance of placement mistakes.  The block on the right - called Rail Fence Block - was our 'homework' and whilst it looks complicated consisted of long strips of our chosen fabric sewn, pressed, cut and then placed in criss-cross order and then sewn.  It was very important that the strips aligned perfectly otherwise the effect would've been lost.


The block for Week 2 (on the left) - Churn Dash Block - involved learning the technique of half square triangle pieces, in particular the trick to cutting and sewing on a diagonal so as not to stretch the fabric which would then of course affect perfectly matching the seams of the other squares.  Having learnt that technique our 'homework' was the Sawtooth Star Block (on the right) where two triangles were joined onto the one rectangle piece before sewing onto the other squares.  Fabric choice was important with this block so that a definite 'star' was obvious but just as important was the precision of the points of the star sewn into the seam so there were neither gaps nor overlap.  It's with designs like these that you realise how important correct seam allowance is.


Last week our block - Variable Star - extended to learning 1/4 square triangles and once again carefully choosing fabric to create the effect and whilst looking complicated, it really is just a matter of being organised and concentrating on which pieces should be sewn together and double-checking as you go along to avoid mistakes.  I was rather pleased with myself on this one as it all lined up perfectly first time.

For 'homework' this week we are hand appliqueing shapes onto background fabrics using Vleisofix - which for me will be the most enjoyable of all the blocks as it involves hand embroidery and the use of blanket stitch.  There are 3 other ladies in the class and all of them don't embroider so they needed to buy embroidery needles, thread and shown how to stitch.  Our teacher knew I was an embroiderer, and when she asked me if I was right for supplies I just gave her a 'you've got to be kidding' look and politely told her that I had plenty in my stash to choose from (she had NO idea how many threads are in my threadbox).  Then with a chuckle, she facetiously asked me if I wanted a quick lesson in how to do blanket stitch to which I replied that I thought I'd be alright!! 


Last night I chose fabrics from my dwindling supplies, cut and pressed the shape for applique on background fabric and agonised over which shades of thread to use.  This afternoon and evening I plan to thoroughly and leisurely enjoy my Sunday by stitching and sewing this last block together.  Next week we begin assembling all the blocks and so I'll post at a future stage on the progress of my beginner's quilt.

But for now, please excuse me - I have 'homework' to do.

Ros

'The difference between try and triumph is just a little umph' - Marvin Phillips


Monday, 11 August 2014

A Crazy Weekend

Crazy Quilting that is!!  A couple of weeks ago a few of us ladies from the Guild group decided to treat ourselves to a 3-day stitching weekend not only to 'get away' for a break but to take advantage of learning the skill of crazy quilting which one of our very clever stitchers is quite adept at.  We went armed with all our requirements of fabrics, beads, buttons, threads, laces, braiding, sequins, etc. really quite unsure of what was entailed even though we had studied our friend's work of art, but came away at the end of the weekend totally 'hooked' and inspired by what everyone else had accomplished.

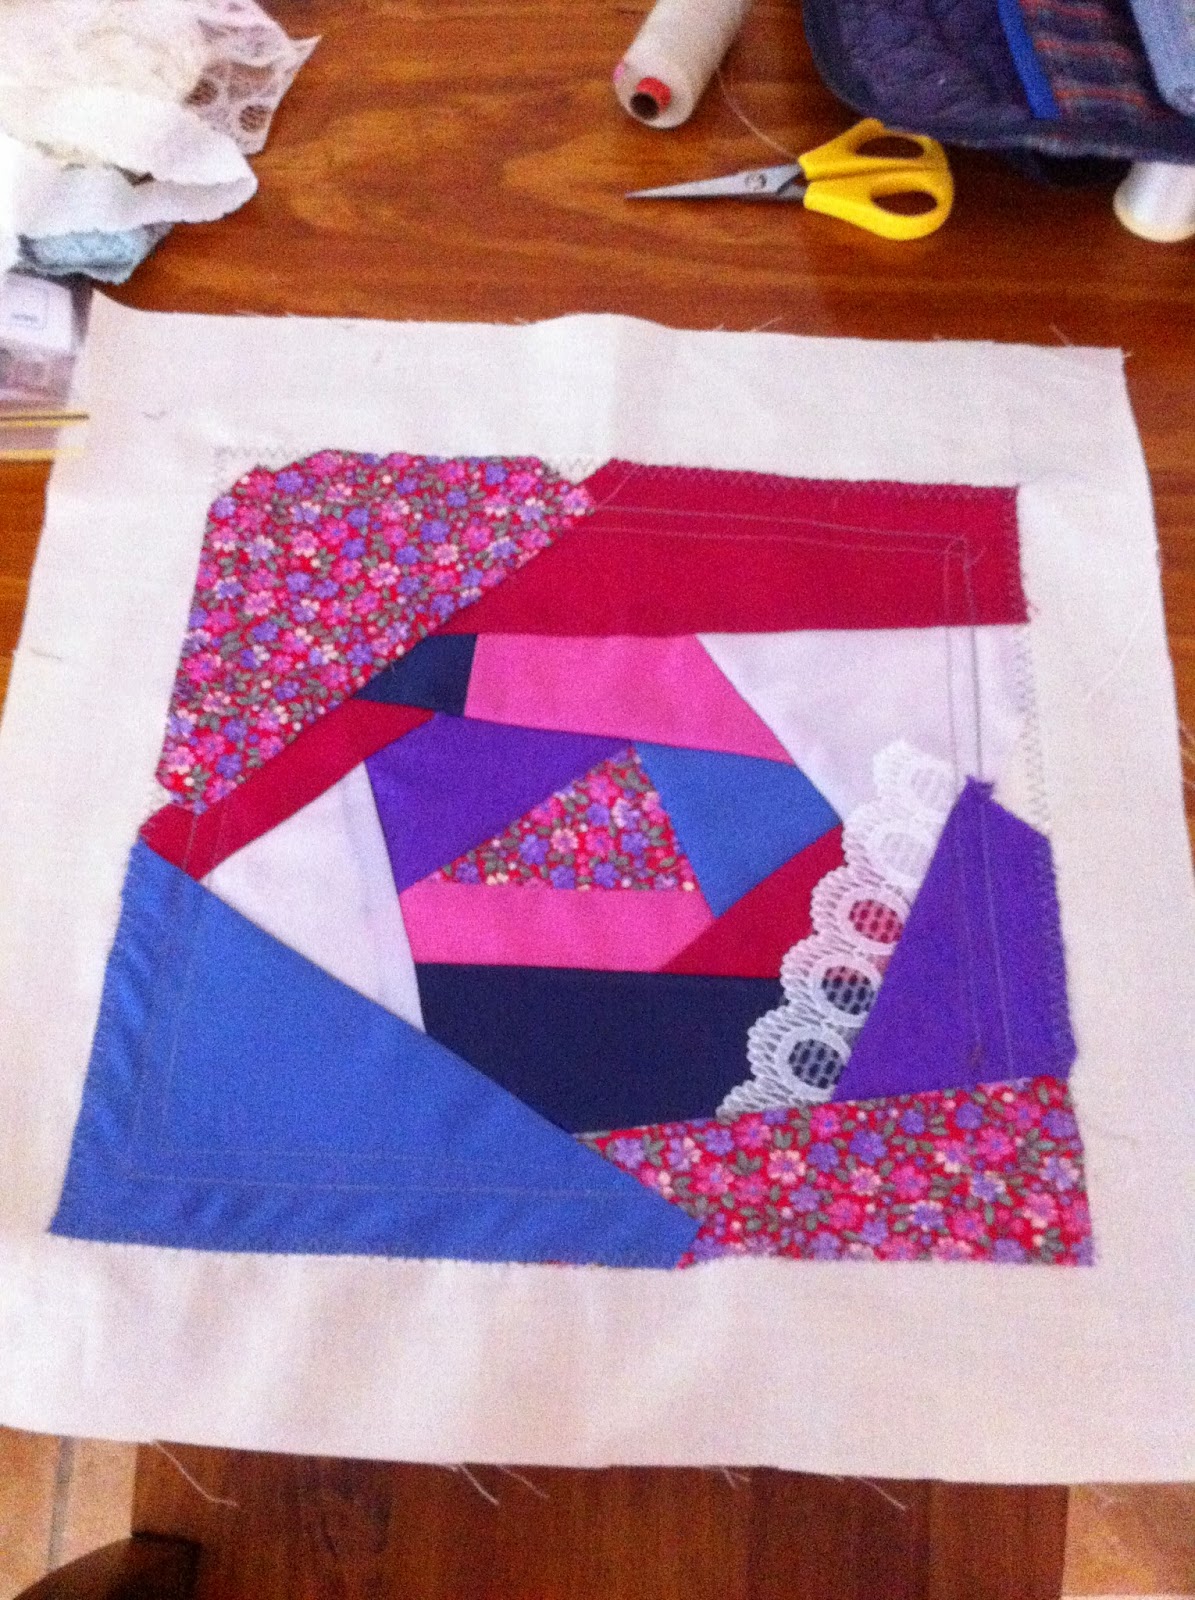
On Friday night (after dinner of pizza of course) we set about machine stitching together shapes of fabric which would become our background.  


The idea is to choose a patterned fabric with at least a couple of different colours and then choose 2 or 3 colours from that and then match fabrics in a couple of different shades from those colours.  You can see by my piece that I chose pink, blue and white to work with.  Varied shapes are then cut and added to make an interesting and balanced patchwork.  You can also see that on my piece I added a strip of lace with a partial open weave for dimension showing the coloured fabric underneath. What really looks great is using different fabric textures or a single 'special' fabric to highlight and draw the eye's attention.  As this was my first practice piece I only used fabric from my stash so there was nothing really special about the fabric.  We had pre-determined the finished size and when we reached that point, machine stitched two rows of straight stitch around the edge and after trimming to size zigzagged the edges to avoid fraying.  I should add that this had all been stitched on a square of calico large enough to be placed in an embroidery hoop ready for the next exciting stage.


Now the next part is where imagination and creativity comes into play because by using all embellishments at your disposal you cover the seams however you wish.  Different threads were experimented with and stitching techniques used in association with beads and braids to give - what I think - a beautiful finish.   Let me say right now though that my crazy quilting piece is nowhere near finished as there is still a lot of work to do and it is quite time-consuming but seriously addictive.  It was so inspiring to see what ideas and techniques the other ladies had used and which could possibly be applied to our pieces of work.  The great thing about this was that everyone's work was so different and unique and I found the style and colours everyone chose to use really did reflect their individual personality.

The one thing that our friend/tutor kept telling us when we would become unsure on our next step was that with crazy quilting 'the rule is that there are no rules'.  Now that's what I call freedom.

Ros

'The roots of education are bitter, but the fruit is sweet' - Aristotle