Showing posts with label colour. Show all posts

Tuesday, 8 March 2016

Colourful Coleus

This is a quick post to show the planting done on Sunday morning to brighten up our front and back verandahs.  I visited my favourite plant nursery with no particular type of plant in mind - just wanted something that was showy, created impact and relatively maintenance free - but I also knew I wanted a plant that would complement the two large copper pots they would be placed in on the front verandah.  These copper pots had belonged to my mother-in-law (who passed away some years ago now) and my husband painstakingly restored them for me.  


The lighting in the photograph doesn't really do justice to the shine that these copper pots now have but I thought the colouring of this particular Coleus (with a name of Sultana) suited it perfectly.  As you can see, the other pot has been placed at the far end of the verandah and both will receive good sunlight in the morning.  


I just love the frilly effect effect around the perimeter of the leaves and the lacy effect on the veins. My crafty mind imagines the colours have been crocheted together with a picot edge.


This other Coleus variety with a softer shade of green and cream and pink/red centre has been placed on our back verandah and blends well with our house colours.  


I've been so happy with the effect of these Coleus plants there's a good chance I'll be buying more varieties to place in other areas of the garden or to add to the verandahs. There are just so many different colours and leaf shapes to create interest.  

Ros

 'Life is about what we give, not about what we get' - Ken Duncan


Thursday, 2 July 2015

New Design Release - Gouldian Finch

I have just spent the morning, on what is a typically glorious winter's day in Brisbane, pottering in the garden and raking leaves to use as leaf mulch for the native garden.  The warming sunshine does 'something' to the happiness and agility of the body, mind and soul and it was while I was in this cheery state of mind that I thought it fitting to release a new design which reflected the mood of my day. 

I'm sure no-one would disagree with my choice of the Gouldian Finch.  This little fellow simply takes your breath away not only because of the intensity and vibrancy of colour, but the fact that it is such a dainty and sweet little thing blessed with so many colours.


Although bred in captivity nationwide, the natural habitat of Gouldian finches is in the tropical savannah woodlands across all of northern Australia stretching from the Kimberley region in Western Australia to the Cape York Peninsula in Queensland with the most prevalent area of distribution being in the Katherine region of the Northern Territory.  They live within small areas and only move when their food source of sorghum or grass seeds and/or water is scarce.  Both male and female Gouldian Finches are brightly coloured with black, green, yellow and red markings but the females tend to be a little less brightly coloured and their chest more of a light mauve in comparison to the male's purple chest. With their fully grown size only 130-140mm (approx. 5") they make ideal pets, but in the wild are in continuing decline due to habitat changes, fires and predators and the fact that they are not a particularly hardy bird and susceptible to cold and stress.

It was fun choosing the colours and variations for this cross stitch design but to replicate the Gouldian Finch in its natural beauty and achieve the desired effect it was necessary to use a total of 15 colours.  It's finished sewn size is 74 x 64mm (2.9 x 2.5in) or 41 x 35 stitches.


Perhaps what I love most about this bird is the story behind its name.  John Gould, a British ornithological artist, named this beautiful bird the Lady Gouldian Finch after his wife Elizabeth even though she did not hold the title of 'Lady'.  However in Australia reference to the title has been dropped.

Ros

 'That which is loved is always beautiful' - Norwegian proverb

Thursday, 23 October 2014

Fringe Benefits

Over the past few months my husband and son have been creating magic in our front yard by building raised garden beds and replacing dated framed lattice panels with wooden slats all of which is giving a fresh and modern appearance to the house - and, may I add, some wonderful compliments to the 'carpenters' from our neighbours.  My part in all of this landscaping project is to oil the wooden slats for weather protection and select plants for the garden beds - a job which I have undertaken with much relish.  

I decided to fill the beds with native plants and delighted in the task of visiting the plant nursery to choose suitable plants.  As time goes on and my natives flourish they will form the subject of other posts, but for today I would love to highlight a pretty and delicate flower which, up until I saw it at the plant nursery, didn't realise its quaint size.  It is in fact one of my earliest designs - the Fringe Lily - and I must admit that when I saw it, I just knew I had to buy it (much like a pair of shoes or dress) because it is such a sweet little flower.


There are a cluster of buds on a stem and each flower only blooms once but they don't all bloom at the same time so each new day brings a new and perfect bloom.  It took about a whole week for this particular cluster to complete flowering with about four blooms each day and there are a couple of smaller clusters still yet to flower.  The flower itself is about the size of a thumbnail but what I found absolutely unusual was the pretty frilled fringe around each petal and the gorgeous colour.


My cross stitched design of the Fringe Lily depicts the actual flower perfectly with its markings and colourings and the frilled edge. It contains 9 colours and measures 82 x 73mm (3.2 x 2.9in) in size and there is currently a Fringe Lily card for sale in my Etsy shop on purple cardboard.


I don't seem to recall the flower having a fragrance, but I think we can forgive it for that when it produces such beauty and provides such pleasure.

Ros

'Always be a first-rate version of yourself instead of a second-rate version of somebody else.' - Judy Garland


Tuesday, 9 September 2014

Jo-an-Ray

About 10 years ago I decided to undertake the ambitious project of cross stitching a picture of my parent's house (my family home) for their 50th wedding anniversary.  Apart from the fact they had lived all their married life in this house and that it had undergone two major renovations, this robust house had also survived two catastrophic floods - the 1974 flood where the waters totally inundated it and the 2011 flood where it peaked at just under the roof.  I also wanted a sentimental keepsake for my parents as I knew that eventually they would 'move on' to retirement accommodation and this would provide memories for them.


The cross stitch program I have enables me to import a photo which will automatically convert it into a chart and then tweak the colour if needed.  I should add here that this was the third cross stitch house project undertaken (the others will be the subject of future posts) so I felt confident enough with the task of emphasising the shading and lighting required to create a realistic interpretation of the 'real thing'.  There were many computer hours spent on perfecting the 34 colours used, but many, many, many more in the stitching process which comprised of a total of 64,518 stitches and 362 stitching hours (yep I kept track!!). Framing completed the work beautifully and it hung proudly in their lounge room and was one of the very first items to be whisked out of the house with the threat of another flood in 2011. 


After the flood my parents did indeed 'move on' to retirement village accommodation and hung their family home portrait proudly in their lounge room.  But the fate of the actual house is an interesting story with it first being sold to an investor for rental purposes and then later sold to a developer where it was duly demolished to make way for construction of a newer and modern house.  We had heard from old neighbours and friends still living in the area that construction of the new building was well underway so the other week my Mum and I went to visit the site and inspect the progress and simply could not believe our eyes.


With the scaffolding it's a little difficult to get a true appreciation of the size, but let me tell you that this massive construction is actually two (2) three-level houses and with a pool in each backyard, there will be hardly any grass.  The neighbours have been practically built out with very little light or air flow or privacy.  I will post an update when the houses are complete.  

It really is hard for me to comprehend that 60 odd years ago a simple, small 2 bedroom hardboard house sat in the middle of this large quarter acre block and now all these years later 2 massive houses occupy it.  To think that I used to ride my bike around the house and then later when I had my drivers license and bought my first car that I could park it at the side of the house (of course Dad's car got the covered garage).

Jo-an-Ray was a 'play' on my parent's names of Joan and Ray and a very good family friend made a plaque with this name on it for them when they were first married and it was attached to the front of their house all the years they lived there.  When they sold the house, we made sure the plaque went with them.  It has been cleaned up and now sits proudly on the brick wall at the entrance to the new home and my cross stitch of the family home is proudly displayed in its new place on the lounge room wall.  It is indeed a beautiful family heirloom.

Ros

"We must always change, renew, rejuvenate ourselves, otherwise we harden" - Goethe


Monday, 11 August 2014

A Crazy Weekend

Crazy Quilting that is!!  A couple of weeks ago a few of us ladies from the Guild group decided to treat ourselves to a 3-day stitching weekend not only to 'get away' for a break but to take advantage of learning the skill of crazy quilting which one of our very clever stitchers is quite adept at.  We went armed with all our requirements of fabrics, beads, buttons, threads, laces, braiding, sequins, etc. really quite unsure of what was entailed even though we had studied our friend's work of art, but came away at the end of the weekend totally 'hooked' and inspired by what everyone else had accomplished.

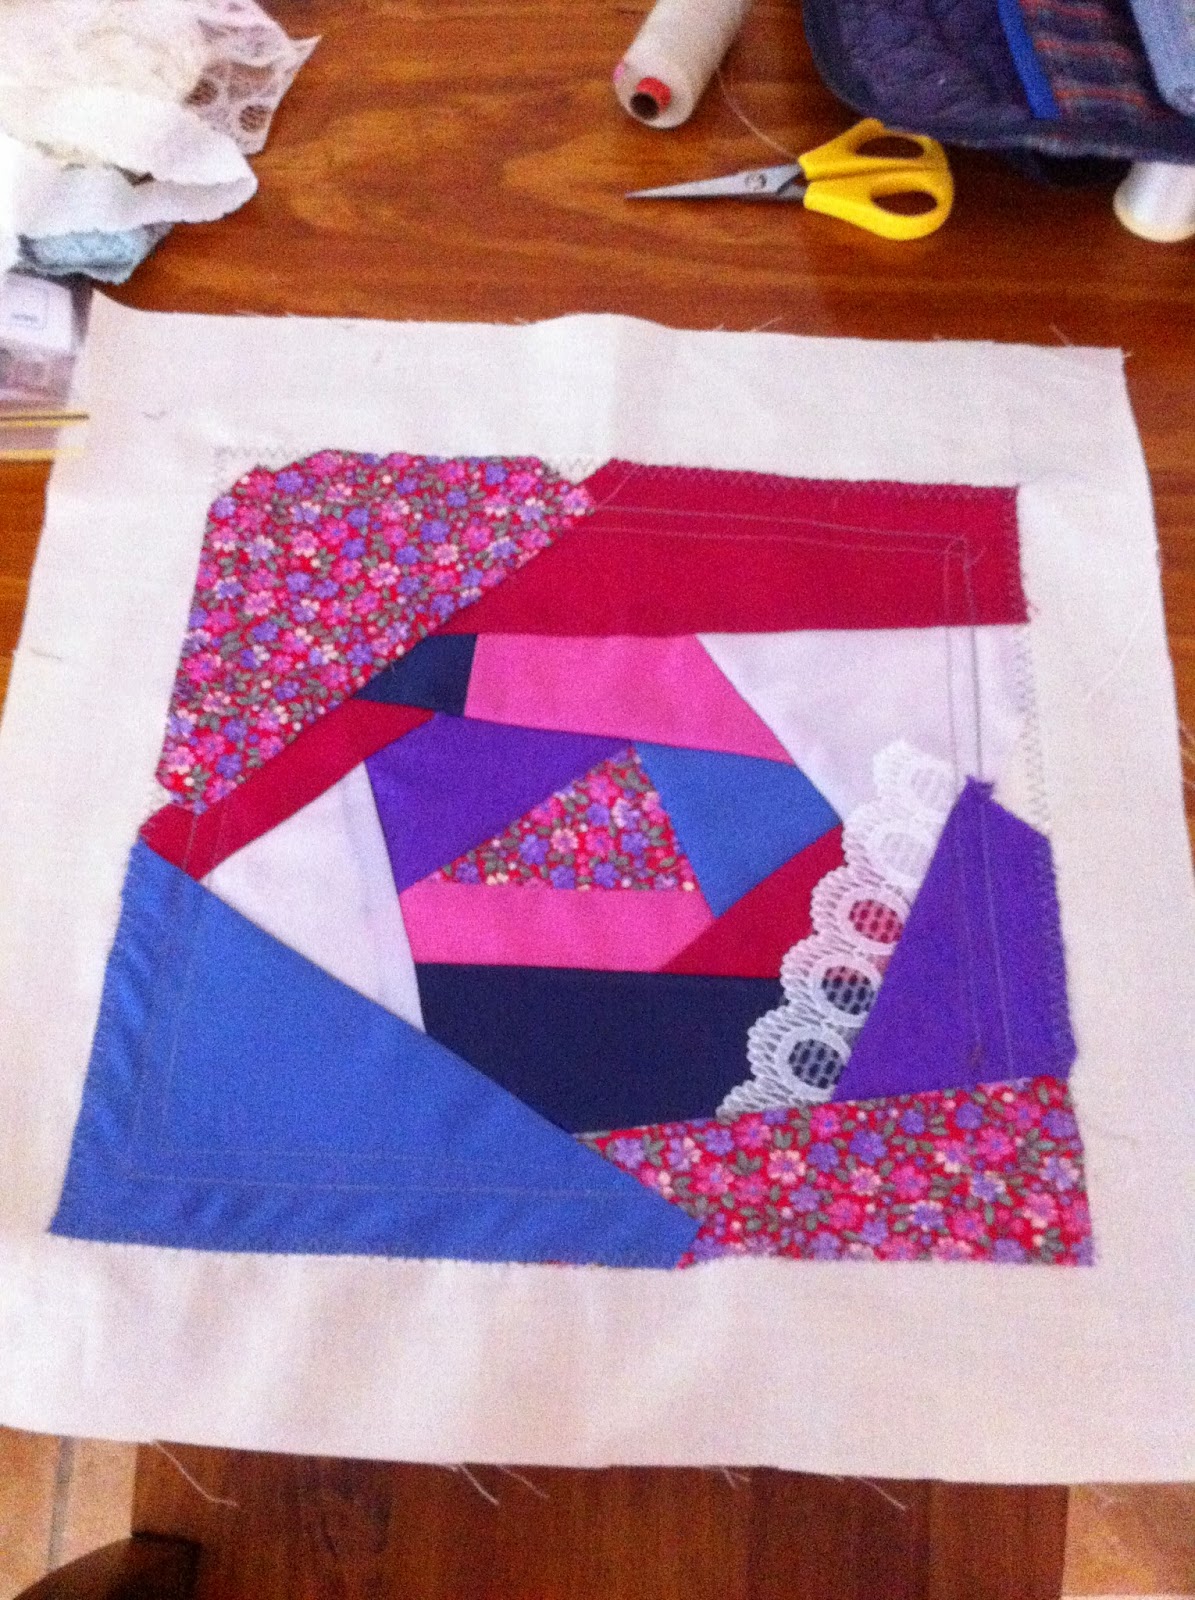
On Friday night (after dinner of pizza of course) we set about machine stitching together shapes of fabric which would become our background.  


The idea is to choose a patterned fabric with at least a couple of different colours and then choose 2 or 3 colours from that and then match fabrics in a couple of different shades from those colours.  You can see by my piece that I chose pink, blue and white to work with.  Varied shapes are then cut and added to make an interesting and balanced patchwork.  You can also see that on my piece I added a strip of lace with a partial open weave for dimension showing the coloured fabric underneath. What really looks great is using different fabric textures or a single 'special' fabric to highlight and draw the eye's attention.  As this was my first practice piece I only used fabric from my stash so there was nothing really special about the fabric.  We had pre-determined the finished size and when we reached that point, machine stitched two rows of straight stitch around the edge and after trimming to size zigzagged the edges to avoid fraying.  I should add that this had all been stitched on a square of calico large enough to be placed in an embroidery hoop ready for the next exciting stage.


Now the next part is where imagination and creativity comes into play because by using all embellishments at your disposal you cover the seams however you wish.  Different threads were experimented with and stitching techniques used in association with beads and braids to give - what I think - a beautiful finish.   Let me say right now though that my crazy quilting piece is nowhere near finished as there is still a lot of work to do and it is quite time-consuming but seriously addictive.  It was so inspiring to see what ideas and techniques the other ladies had used and which could possibly be applied to our pieces of work.  The great thing about this was that everyone's work was so different and unique and I found the style and colours everyone chose to use really did reflect their individual personality.

The one thing that our friend/tutor kept telling us when we would become unsure on our next step was that with crazy quilting 'the rule is that there are no rules'.  Now that's what I call freedom.

Ros

'The roots of education are bitter, but the fruit is sweet' - Aristotle


Saturday, 28 June 2014

Design Release - Strawflower

Today I am excited to release a design which I have been working on over the past couple of weeks - the Strawflower.  I am also just as proud to mention that this design was inspired by beautiful strawflowers that I have growing in my garden at the moment with the photos below being proof.


Blooming in differing shades of both pale and bright colours they certainly make a striking display in the garden.  What has amazed me though is that, although they flower best in the hot summer months, these beauties have thrived during our winter and in a position that hasn't been receiving much sunlight. 

Strawflowers are found Australia wide growing in many different habitats from rainforests to deserts to subalpine areas and provide a food source for butterflies, bees and insects.  They are a herbaceous shrub growing to a height of up to 80cm high and have lovely leafy green foliage.  But what makes these little beauties so special is the different texture of their petals (or bracts) which are stiff, papery and dry making them a perfect long lasting flower.  Touching them actually does feel like very light cardboard yet they are quite strong and it is because of this texture that they are ideal as dried flowers and for use in the cut flower industry.


Replicating the sharp edges of the strawflower was a challenge when designing this flower and my aim, as always, is to be as authentic as possible so some stitchers may find the design a little intricate.  This is probably the only wildflower design where the availability of different colours for a flower have been included in the one design and therefore a total of 13 colours have been used.  

But with such an array of colours to choose from to portray the Strawflower, it was just too difficult for me to decide on just one.  Or......maybe.....it was just an excuse for the artist in me to experiment with colours and my stash!!!

Ros

'Flowers are those little colourful beacons of the sun from which we get sunshine when dark, sombre skies blanket our thoughts' - Dodinsky


Saturday, 14 September 2013

Bottlebrush on Fire

Despite the fact that we are in the middle of an extremely dry and bushfire-wary Spring (it's been simply months since we've experienced any rain) and that everyone's gardens and lawns are sadly brown and dying, it's been wonderful to notice in the last week or so colour along streets and in parks due to the blossoming of the spectacular Bottlebrush flower.  The tree in our very own front yard (picture below) has already begun to burst into a mass of colour and also enticing birdlife - in particular Rainbow Lorikeets - to feed from the nectar within the flower.  What really amazes me though is that although the branches and leaves themselves appear brown and lifeless, it hasn't prevented the flowering process - in fact it gives the impression of 'Bottlebrush on Fire'.


So with this in mind, I thought it appropriate to give a few interesting facts about this native plant whilst in its glory. Belonging to the Myrtaceae family and a member of the genus Callistemon, the plant is found from the tropical north to the temperate south along the east and south east of Australia with two species found in the south west of Western Australia and whilst it thrives in damp conditions, it is hardy, frost and drought tolerant and requires little or no maintenance.  Bottlebrush grow in a variety of soils and requires full sun for the best flowering in spring and summer when it attracts nectar-feeding birds and insects.  Flower spikes are made up of a number of individual flowers and pollen forms on the tip of a long stalk called filaments which gives the distinctive 'bottlebrush' shape. The Bottlebrush make excellent garden plants and its popularity began soon after European settlement and then introduced to Britain by Joseph Banks in 1789.  

Some of the varieties of Bottlebrush that grow in most parts of Australia are Prickly, Crimson, Kingaroy, Lemon, and Weeping all growing to a height of 3 to 5 metres, with either red or lemon coloured flower spikes.  The Alpine is a compact 1 metre bush with yellow flowers and the Willow with white or greenish flower spikes which can also be found in the pretty colours of pink, red or mauve.  Harkness, Hannah Ray, Dawn River Weeper all have a weeping habit, Little John has blue/green foliage, and Reeves Pink and Mauve Mist have pink flowers.


My cross stitch design could belong to any one of the above red flowering varieties and was one of my very first designs due to my being surrounded by inspiration.  With the use of long stitch from the central stem to the outer flower overlapping each other it gives a three-dimensional effect and the black and yellow french knots finish the design beautifully.

In the past, I have placed cut Bottlebrush stems in a vase to inject a profusion of colour in the house. Unfortunately, the spikes or 'needles' are frail and drop quite easily leaving a mess and dry stalk which really is not very attractive, so now I prefer to appreciate the beauty in its natural form remaining on the tree and for our native birdlife.

Ros

'Life isn't about how you survived the storm ... it's about how you danced in the rain'

Saturday, 17 August 2013

Groovy Babe Cushion

Today is a special day in the family with our daughter celebrating her 24th birthday and as my designing and stitching time has been drastically affected this year due to my Dad's health issues requiring my support, I thought I'd share the gift stitched for her a few years back.  Our daughter has always been a modern young lady, interested in fashion and bright colours, so this particular design suited her personality and tastes perfectly.  


Groovy Babe was one in a series of fortnightly designs from Cross Stitch Magic by Eaglemoss Publications where the graph, instructions and suggestions for materials and stranded cottons were provided as well as applications for each design, however, on this occasion I altered the colours to suit what was available in my stash at the time.  I chose to stitch the design on a panel, use contrasting fabric and a buttoned back enclosure enabling the insert to be removed and the cover to be carefully washed should the need arise.

The cushion is still lovingly displayed after all this time along with Groovy Babe's quirky posture, facial features, hair and dress sense.  

Ros

'That which is loved is always beautiful'  -  Norwegian proverb

Saturday, 13 April 2013

King Parrot

Let me share with you what greeted me on our back deck this morning - this gorgeous, brightly coloured male King Parrot. 

My daughter and I spied two pairs washing and preening themselves in the rain on a backyard tree and when we went outside to get a closer look, this particular King Parrot flew away only to return to our deck and then turn himself around and shake off the excess water in his wings (which is why he looks all fluffed-up).  It then seemed as though he deliberately remained long enough to 'pose' for this photo before then taking flight and displaying his colourful wings.


We have lived in this area for 25 years and whilst we have daily visits of Rainbow Lorikeets and regular visits of cockatoos, kookaburras and galahs, it has only really been in the last six months that King Parrots have made their way into our garden, even though they are found along the entire Australian eastern coast and inhabit forests and eucalyptus trees .  They make a spectacular sight, not only because of their bright colour, but also because they're quite a large bird growing to an average size of 42 cm (18 in.).  The female King Parrot, whilst the same size, has a greener colouring on her chest and head.  

My design for the  King Parrot stitches up beautifully and uses vibrant, intense shades of colours.  It measures 60 x 96mm (14 count) or 33 x 53 stitches. 


The bookmark design is another favourite and one which can be stitched up quite quickly as a last minute gift for an avid reader.  


What I like about this bookmark design also is the fact that it would be suitable for a male by just using the cardboard backing but a feminine touch could be created by adding tassels, beads or bling.  

Ros

'Don't cry because its over ... smile because it happened.'