Saturday 26 August 2017

Stitched Headphone Bag

My latest little project has been making a small headphone bag for travelling.  Because it's going to be tucked into luggage and overnight carrier bags it's main criteria was for it to be padded for protection of the headphones but small enough to be compact and not take up any unnecessary space.  My client (daughter) just asked for a 'quick and simple' bag that "uses up some scraps Mum" / "don't go to any trouble Mum / "leave it up to you Mum".  She knows me far too well now that when faced with a stitching or sewing challenge it's a great opportunity to use my creativity.  And this time was no different.  

I had in mind the shape and style and a little bit of 'googling' helped with the design and how to go about assembling the bag particularly since it was going to include a simple padded and quilted lining. 

The fun part was searching for appropriate and complimentary fabrics and notions from my stash and a lovely design to embroider on the front and back of the bag. I opted for a simple backstitch in an 8 ply DMC ecru Cotton Perle and used bright pink sequins attached with french knots. 


A strip of heavy cotton lace was attached to the upper front mid-section and secured with sequins and french knot centres.  Identically sized pieces were cut of the lining fabric and wadding and then simply quilted.  The two front sections were sewn to the pink zip with a slight extension to the end of the zip allowed for the side seams.  Because I didn't want an exposed seam inside the bag, the next bit was a little fiddly.  It involved sewing the quilted lining (right sides together) around the perimeter and then inverting through the zip opening. The outer fabric was then sewn (right sides together) with an opening left to invert which was then neatly slip-stitched.  Because the headphones have a width to them, I also squared off the both bottom corners of the lining and outer fabric before inverting to accommodate this width.  


As the headphone set also included a small adapter I sewed a small elasticised pocket on the lower inside lining for its safe keeping and easy accessability.


As it's the first time I've made something like this, I'm quite proud of my efforts and have learnt a couple of new skills.  Also learnt from some mistakes too....  I hope it does the trick.


Ros

'Continuous effort - not strength or intelligence - is the key to unlocking our potential'. - Sir Winston Churchill

Monday 19 June 2017

New Design Release - Pink Mulla Mulla

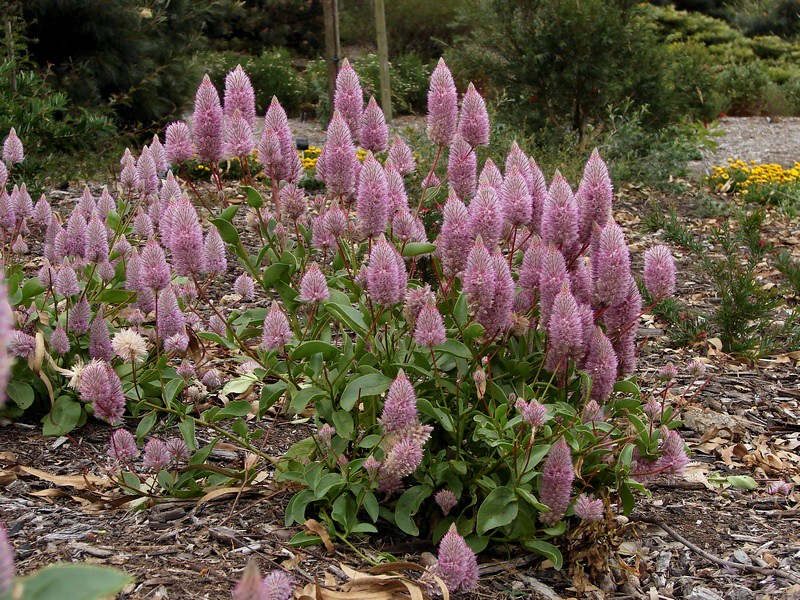
So very pleased to release a new design today - the Pink Mulla Mulla.  It is found widespread across Australia in arid and semi-arid areas in a range of habitats requiring good soil drainage in sunny and open positions and grows to a height of 1.5 metres.


Image result for Pink Mulla Mulla


I remember the first time I set eyes on this pretty little plant.  My family had taken a trip to the Brisbane Mt. Coot-tha Botanical Gardens to the Australian Natives area for a picnic morning tea.  Amongst the varieties of banksias, grevilleas and bottlebrushes, etc. were these Pink Mulla Mullas and I simply fell in love with them.  They look as though their flowerheads would be spiky and sharp but on the contrary they are so soft and fluffy and sway ever so gently in the breeze.   Imagine my sheer unadulterated excitement ... (ahem - my 'delight' - I don't want to come across as a total flower nerd) ... when I found a couple of these plants at my favourite plant nursery soon after.  Of course like a shoeaholic - if that's a word - I just had to buy a couple and plant them in my native garden.  Yes they flowered for a length of time enough for me to admire and enjoy, but then died so were sadly dug out. 

My research showed Greek and Latin origins for the botanical name of Ptilotus nobilis - Mulla Mulla.  Ptilon (Greek) meaning down or feathers - reference to the appearance of the flowers and nobilis (Latin) meaning notable or famous which refers to the flowering habit of the plant.

I spent quite a bit of time perfecting the Pink Mulla Mulla cross stitch design.   It was vital to achieve it's unique shape and colouring and the all important spiked effect.  The design is 58 x 109mm (2.3 x 4.3in) or 32 x 60 stitches in dimension and contains 9 colours.  


Think it might be time for another picnic morning tea visit to the Gardens again!!

Ros

Wednesday 31 May 2017

'Sew Happy' Quilt

I decided to have a tidy up of my craft room just recently which really just morphed into a clean out session.  This involved going through a lot of my dressmaking fabrics, samples, off-cuts and fat quarters and I came across so many remnants that the creator in me just knew they couldn't be thrown away for fear of it being considered criminal.  So I came up with the idea of making myself a new sewing machine table quilt from these remnants.  The current table cover was an old tablecloth which really had seen better days so between other projects and market preparations, etc. I set about creating a small quilt just for me and just for my creative space.  I figured it would also help hone my quilting skills. The basic criteria though was to use as much of these remnants as possible to free up valuable storage space (for more fabric...yeah I know....go figure that logic) and to create a project that would bring back memories of what the fabrics had once been sewn for.  


The size of the quilt was really based on the amount of fabric I had and to cover the wooden table adequately as the top is old and a little bit chipped but still quite sturdy.  The blocks were based on the railroad design and even though I didn't worry too much about matching colours and patterns for each block I did take into account the overall effect so some fabrics were used in multiple blocks. 


With the short strips that were left over and not stitched into a block I decided to use as a border around the perimeter.  This really helped use up so many small pieces of fabric and once again they were added in no particular order but placed around the blocks to evenly distribute the colours.   


For the backing once again I recycled.  Recently my son updated his room with a new paint job and curtains.  The backing of the old curtains were still perfect so I used one and sewed some larger pieces of remnant fabric on it ... just for the heck of it .... by using the buttonhole stitch on my sewing machine. 

I opted for inexpensive polar fleece for batting and then began the task of quilting all layers together using a diagonal stitch across the whole quilt and then stitching around each block. The effect can easily be seen on the photos below and above.


Binding used up more scrap fabric and then the all important naming of my sewing table quilt - 'Sew Happy' - which to me represented all the years of sewing I've done either making clothes for myself or my children, craft items or quilts and the happiness I've derived from being creative and developing such a sense of achievement.

My Sew Happy quilt is now proudly spread on my sewing table with my sewing machine placed on top and will be a constant reminder of all my past sewing projects.

Ros

'Happiness is a perfume you cannot pour onto others without getting a few drops on yourself' - Ralph Waldo Emerson

Wednesday 8 March 2017

Hoop Hoopla

My latest foray into creating new and exciting items for my Etsy shop is hoopart.  Based on trends in my Instagram feed by other extremely creative embroidery artists and stitchers, it appears to be quite a popular, modern and artistic form of home decor.  So with that in mind I thought it was worth using my own cross stitch designs in wooden hoops on a range of different coloured evenweave fabrics to gauge the effect.  And...I am not disappointed.

I have chronicled the process -

A beautiful grey-swirl evenweave fabric from Sew-it-All was chosen to complement the vivid red colours of the striking Sturt Desert Pea.  The fabric was first machine-edged to prevent fraying whilst stitching and then placed firmly in the hoop before tightening to keep tautly in place.  The relaxing job of stitching the design then began. 

  
Once finished, I used the 'measure twice/three times - cut once' rule (and a good dose of dutch courage!) to cut a 2cm edge around the outside hoop edge which was enough for folding over into the back of the inside of the hoop with a little extra allowed for tucking under.  As I wanted the wrong side of my work to be covered, I devised a method where a piece of wadding was cut to the size of the inside of the hoop as well as a plain black cotton fabric - with an extra 1-1/2cm added all round the circumference.  A tacking stitch was then used around the edge of the black cotton and slightly pulled in to evenly encase the wadding.


It was then just a case of folding the evenweave fabric over the back of the hoop and placing the black encased wadding into the open space, pinning the two fabrics together at close intervals to keep in place (I could've used half a dozen hands here) and then neatly slip-stitching together.  


This is now a stable piece of work and with the addition of complementary narrow black ribbon attached to the screw top, ready for hanging on a wall in an area of the home that needs a little bit of brightening and cheering up.


This is the first hoop in a series yet to be stitched in preparation for the next Hustlin' Womens Markets on April 8 where I will be having another stall.  

Ros 

'Home is the nicest word there is'.  -  Laura Ingalls Wilder


Wednesday 1 February 2017

Design Release - Geraldton Wax

Welcome to February.

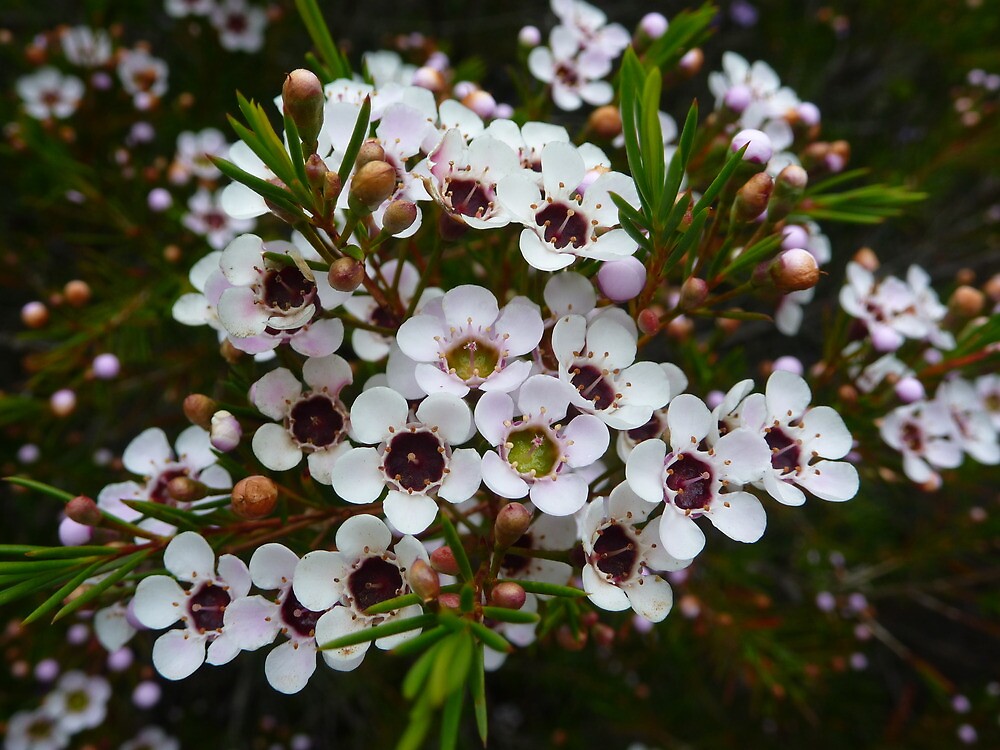
So happy to be able to release a new design today which I have just finished working on and that is of the Geraldton Wax which, as the name suggests, is endemic to Western Australia.  It's a beautiful and hardy medium to large shrub bearing either white, pink or purple blooms and aromatic leaves and can grow to a height of 4 metres which, as you can imagine, would look just spectacular when in flower en masse.  I can only imagine the fragrance too.  This also makes the plant highly attractive to bees and pollinating insects.  The petals have a unique circular shape which are separated from each other and quite robustly formed.  

Image result for geraldton wax white


The Geraldton Wax is a well known Australian native flower and extensively used in the cut flower industry for its beauty and longevity.  Many years ago when I was doing floral work, Geraldton Wax was pretty much the only standard 'fill-in' flower for arrangements and bridal bouquets - as well as Gypsophilia (Baby's Breath).  Sprigs would be used in corsages and buttonholes to complement the bride's and bridesmaid's bouquet.  What I do remember most about working with the flower was its rustic and heady fragrance and the almost woody feel of the stem in comparison to other more fragile flowers. Today native flower bridal bouquets are quite popular and with such an array of beautiful native flora on the market, it's great to see the Geraldton Wax has stood the test of time.


My design is 64 x 76mm (2.5 x 3in) in dimension when using 14/inch fabric or 35 x 42 stitches.  It uses 8 colours and double strands for the stem and needle-like leaves to give the impression of strength and robustness.  Both stem and leaves are stitched using filament threading whereby a single thread of two different shades or colours are threaded in the needle and then stitched together as one.  Small french knots for the centre of the flower and larger and thicker french knots for buds complete the design. 

As with all my designs, instructions are clearly set out on all kits and charts and available now on my website.  In time, this design will be stitched as an item and listed in my Etsy shop.  I feel as though the shape of the design could lend itself quite well as a needlebook and look quite pretty on complementary evenweave and contrasting cotton.  What a great excuse to buy more fabric!!

Ros

'If you love life, life will love you back' - Arthur Rubenstein

Friday 30 December 2016

Reflections on 2016

So.....here we are again - end of another year and the New Year looming!.  And if you're like me you may well ask yourself just what you achieved this year.  When I checked my diary it turned out to be very quiet on the designing front - something which I intend to work on in 2017.  But I won't be too hard on myself because I achieved a lot in other areas.  

At the beginning of the year I was privileged to be accepted as a tutor with the Queensland Embroiderers' Guild for their children's holiday classes.  It was a most enjoyable experience as the two young girls in my charge were well mannered young ladies who were focussed and worked diligently enough to finish their project in the 2 day workshop and felt justifiably proud of themselves.  

  
Soon after, our neighbours were having a massive clean-out in preparation for a downsizing move and when lengths of fabrics, threads or craft of any type were found I was fortunate enough to be the lucky recipient.  But it was the plastic bag containing cut-out shapes for a large stuffed teddy bear that had already begun to be embellished with lace, ribbons and embroidery that caught my eye and I decided to surprise my lovely neighbour by creating a keepsake for her out of those pieces.  A crazy patchwork cushion came to mind and so I set about painstakingly sewing the fabrics together and then using the embellishments and varying stitches and techniques to create a proud masterpiece.  I can't begin to tell you how happy and amazed my neighbour was when I presented her with the cushion and the tears that sprang to her eyes were definitely appreciative ones .  I can tell you though that this cushion has it's own special place in her new home - that's reward enough for me.


For a while I had been entertaining the idea of updating my cross stitch software (cost was a major factor here) to enable the ability to provide symbol on colour charts with my kits and charts that I sell.  I finally took the plunge and set about the massive task of re-configuring instruction sheets for all designs.  I had under-estimated the time involved for the graphic and administrative work required and I am pretty sure that as a result of constantly using the computer mouse that I gave myself RSI in my forearm and elbow.  All is fine now but it took a little while to heal. Despite the time-consuming effort and injury sustained I am now so very happy with what I can offer my customers.


A new design - the West Australian Seahorse - was released and I set about stitching needlebooks for my Etsy shop.  Six in total have been stitched and proven to be quite popular with all needlebooks receiving good reviews.  

 
Early in the year my web designer wisely suggested the advantages of setting up an Instagram account to highlight my work which was met with a lukewarm response on my behalf (more technology to get my head around!!!).  But with the encouragement of my Gen Y daughter, I made the plunge and am now a total and utter convert.  I simply love seeing the work of other like-minded crafters and have followers from all around the world making for a wonderfully interesting network of stitchers and lovers of flora and fauna.  Instagram has also helped with my photography skills and of course, you can still follow me on Facebook.

Arguably one of the biggest decisions I made this year was to exhibit and sell my work by manning a table at the Brisbane Hustlin' Women's market.  In August I set myself a target and schedule of products to sell and stitched like a 'mad woman' to meet my self-imposed deadlines.  The products not only included what was already listed in my Etsy shop, but new ideas of framed stitched work and spectacle cases which required the tweaking of some of the original designs.  I am pleased to report that I was able to not only complete all of my targeted stitched projects but on market day covered stallholder costs and managed to make a worthwhile profit.  Woohoo!  The experience also gave me a good insight into customer interest of certain products which I can now use when planning for the next market which, at this stage, will be in April.  Spending the day with like-minded crafters just made the day so much more enjoyable too.


I've also been attending monthly stitching afternoons with the Guild and oddly enough tending to administrative work for Etsy and the website is something I don't mind.  It's where my articulate secretarial background comes into play, but I must admit though that if don't keep on top of it, problems can certainly arise.

Next year, I plan to make opportunities to pursue the designing of many more subjects as I feel I've set some very good foundations this year on which to continue.  Already I've looked into other avenues of community craft teaching or at the very least mentoring and sharing the gift of stitching and crafting.

For now my best wishes to everyone for a safe and Happy New Year.  

Ros
'There are far better things ahead than any we leave behind' - C.S. Lewis


Thursday 29 September 2016

Market Preparations

Today is an overcast, gloomy and slightly showery day in Brisbane - quite different from our previous glorious Spring days earlier this week and so a perfect opportunity to spend some quiet time in front of my computer updating everyone on what I've been working on of late.  

A few weeks ago, I decided to take the plunge of manning a stall run by Brisbane Hustlin' Women whose next market will be close to Christmas on December 10.  Markets have always scared me just a little bit because of the amount of stock needed which of course means lots of stitching and which all stitchers know is quite time-consuming.  Throw pricing, table display, branding and marketing techniques into the equation and it's all enough for me to throw my hands in the air and claim that it's all too hard particularly when there's no guarantee of making any sales or a profit on the day.   However, the thought of spending a day with other creative ladies and coming face-to-face with prospective customers sends a certain thrill through me so with my family's encouragement, I've been beavering away and stitching like a mad lady to meet a personal schedule that I believe is doable (hopefully) without putting too much stress on myself.

I kind of figured that the items already in my Etsy shop ie. cards, magnets, keychains, bookmarks and needlebooks would all be great starters as well as selling charts but I've decided to add a couple of other items also.  Spectacle cases are something I have always thought would look special using my designs and will also be included in my Etsy shop.  But I have also decided to try something a little different by framing just a couple of designs and seeing how well they are received at the markets before deciding whether to include them in the Etsy shop.

My worktable at the moment contain works in progress -


The box on the right contains six finished designs all ready for framing -


The frames have been prepared by way of filling gaps with putty and sanding smooth - I can thank by husband and son for working on these.  It's now up to me to undercoat, paint in an appropriate contrast colour and clear varnish seal for each design before attaching the fabric, a protective sheeting over top and a hanging hook. 


 Below is the first of the spectacle cases - the Superb Fairy Wren - which is stitched on evenweave fabric in the colour Stone (really a fawn colour) which highlights the design beautifully.  I've loved working with this beautiful fabric and with seven other cases to make am really looking forward to seeing how they all turn out.  I plan to use a contrast fabric (much like the needlebooks) to line and bind the case and as this is the first spectacle case worked, I think I'll sew and finish it first to iron out any little problems before stitching the others first. Sound like a plan??


As well as all the stitching, I've also been gradually printing out and packaging charts of all my designs.  Yes I could do it all at once, but thought it would become very monotonous so I've just been doing a set few (or 10) each day or so.  That strategy also means that I'll get stitching in each day and my fingers won't suffer from 'itch to stitch' syndrome.

In the top photo on the right you'll also see my schedule listing of what needs to be stitched and crossed off as it's done.  No I don't suffer from OCD, but have found it really helpful to keep me on track and knowing that there won't be a mad rush closer to market date when there's still so much to do.  Also I'll be out of town a couple of times between now and December so I've had to factor that into my timeline as well.

The next big test will be a display table practice.  I have no real skills in this area but a wishy-washy idea in my head of how I think I want it to look.  My husband has kindly offered to make a couple of wooden display stands for the cards and frames so there's another job to do.  I am feeling rather confident at this stage that all will come together and be a success but for the moment it's head down and stitch, stitch, stitch.

Ros

'Live daringly, boldly and fearlessly.  Put forth the best within you.' - Henry Kaiser