Friday 11 December 2015

Cardinal Joy

This year I decided to stitch a Christmas ornament for my Mum to display in her retirement unit.  After the passing of my Dad last year she didn't really feel it appropriate to hang bright decorations in her unit last Christmas but has decided to this year.  I came across this delightful little banner earlier in the year and research informed me that male red cardinals are very protective of their territory and everyone within it and that epitomised my father perfectly.  I felt this design 'spoke' to me.  

The design was sold by Dimensions as a kit which included full instructions, fabric, threads, seed beads, wire hanger and bells and was designed by Anita Phillips.  I'll admit that it was an intricate design and one which took much concentration and close study of the graph but the instructions were clear....so I plodded on.

Here are photos of the process - firstly the finished stitched design with border.


Then the edge was trimmed before it was folded and bells attached with red triple-strand thread through the back of the mitred corner and also the same was done with the wire hanger.


A neat slip-stitch hem was then stitched on the reverse to secure the edges and form a tidy finish over the border.  


I gave Cardinal Joy to my Mum last week and she has already found a home for it - one which catches the eye and is a feature of the room.  As a crafter herself, she absolutely loves it and the story behind it.

From my family to yours, I would like to take this opportunity to wish all my blog readers a Merry Christmas and a happy and safe New Year and look forward to showing and sharing more of my projects and new designs with you next year. 

Merry Christmas

Ros

'Christmas waves a magic wand over this world, and behold, everything is softer and more beautiful.' - (Norman Vincent Peale)


Sunday 8 November 2015

After The Storm

Serendipity is a wonderful, wonderful thing.  It had been on my mind for a week or so now that I needed to write a new post on my blog and whilst there were topics to speculate on or finished projects that I've worked on to show and share, the right descriptive words just weren't forming. Sometimes I take that as an omen to hold off until a subject presents itself clearly and never has that been so obvious than about half an hour ago ... something that I just had to share with everyone because it excited me so much and not just the topic but the timing. 

You see here in Brisbane we have entered the summer storm season with us experiencing a severe storm last night and yet another one at lunch time today.  I had eaten my lunch on our back deck overlooking a view of gum trees and bushland, picked up some rubbish to take downstairs and place in the bin with full intentions of then going to my workroom/office to write a new blogpost.  As I opened the screen door to take the rubbish to the bin, I was pleasantly greeted by a kookaburra sitting on our clothesline drying himself off after the storm.  So ... as you do ... I carefully retraced my steps, grabbed the camera and in order not to frighten him away, quietly started snapping photos.


This little fellow knew he was on display and in typical form, tilted his/her head from one side to the other for complimentary angle shots.


It was quite a tame kookaburra because I couldn't believe it when I was allowed to walk behind him/her and take this back view without the kookaburra ruffling even one little feather ... mind you the beady eyes were watching me very closely indeed.  And then while I was admiring the colours and size of this awesome iconic Australian bird, he then spotted a tasty bite to eat somewhere on our grass, flew to it, grabbed it in his powerful beak and flew to the nearby garden shed to swallow it in one giant gulp.

The kookaburra is one of my earlier designs (consisting of 13 colours) which can be found on the website - www.gumleafstitchdesigns.com.au - and for obvious reasons, quite a popular one.  

Although we have regular visits from kookaburras in the area with their reputable laughing call (which some people take to mean a sign of rain), it's not very often one pays us a visit in our backyard and on the clothesline.  Now, just how Aussie is that!!

Ros

'Sometimes serendipity is just intention unmasked' - Elizabeth Berg


Thursday 8 October 2015

Quilted Case Rules

On a whim a couple of weeks ago I decided to sew a quilted case for my quilting rulers to protect the corners from damage and the possibility of them being accidentally broken or cracked.  It occurred to me that it would be a great way to use up left-over fabric scraps in my stash (of which I have plenty) and a resourceful way to de-clutter.  Cleaning out the pillow-case of scraps brought back wonderful memories of garments that had been made for my daughter when she was very young and even some of my own clothes along with crafts from more recent years so this project really became a collection of memories.  

Firstly I measured a layout of the size and shape that would be needed onto brown paper and then set about blending and sewing the fabrics so the plain and floral colours would be evenly distributed. This was painstakingly done row by row and also in accordance with how much fabric was available for each colour.  The length of each strip in each row was staggered for a brick-like effect.  


But, of course, once the strips were sewn together, the embroiderer in me realised that it could do with a 'bit' of texture and interest here and there which, of course then led to perhaps a 'bit of bling' here and there which then led to filling each plain coloured fabric strip with some form of embroidery and/or beading or sequins.  I'll admit it, I confess ... I was obsessed ... but you see once I had started and could see how beautiful it was looking with just simple embroidery stitches ... alas, I could not stop.


By incorporating simple embroidery stitches of chain, stem, lazy daisy, star, straight, feather, blanket and french knots together with brightly coloured sequins, bugle, seed and pearl beads, it created an incredibly interesting work of art.  Because there was so much bright colour in the fabrics, I decided to only use white stranded cotton and thicker crochet cotton for contrast.  You can see by the above photograph that the edges of the strips were all of a slightly different length but would be neatly cut to the measured size as seen in the photograph below after it had been quilted with contrast fabric and wadding.  I decided to just quilt along the seam of the long strips and not the shorter seams of each strip as I felt this gave enough of an effect without becoming too tedious.


Once this stage had been reached, the blue binding was sewn and slip-stitched into place across the longer top edge before then folding the entire case into shape.


Once this was done blue binding was then sewn and slip stitched into place from the lower folded section through all thickness of front and back, around the overflap and back down the other side.


 A couple of press studs were then hand stitched on the flap and front of the case to ensure the rulers don't move and/or slip out.


This is the back closed view...


and this is the back open view.  After completion, I decided to carefully add a few more sequins on the red section and another backstitched star with seed bead on the black strip as they were on the front flap and 'front and centre' of the project.

I absolutely loved working on this project.  Who would have thought that left-over scraps of fabric, a little imagination and simple embroidery could create something so useful.

Ros

'The difference between try and triumph is just a little umph' - Marvin Phillips


Monday 21 September 2015

Design Release - Numbat

Today I release a new design of a distinctively marked bush animal which admittedly is not very well known about both here in Australia and abroad.  The numbat is a small and colourful creature (between 35 to 45 centimetres or 14 to 18 inches in length) with a long pointed snout, bushy tail about the length of its body and white stripes over its back and rump.  A black stripe also runs over each eye from the base of the ear to its muzzle.  The numbat is sometimes called the banded anteater, marsupial anteater or walpurti and inhabits the natural environment of Western Australia's open woodland eucalypt and jarrah forests.


o

The numbat's diet consists exclusively of termites with an adult requiring as much as 20,000 ants a day for its survival and like many ant-eating animals uses a long and narrow sticky tongue to collect its food from termite mounds.  The interesting fact about this animal is that whilst like all other marsupials it uses its strong sense of smell to hunt for food, it also possesses the highest visual ability of any other marsupial.  Adult numbats are solitary and territorial creatures setting up an area early in life and remaining there after that with the only exception of venturing out in the mating season.  These gentle creatures currently have an endangered status with their predators being foxes, carpet pythons and various falcons, eagles and hawks.


I have to admit that this cross stitch design was a challenge trying to feature the stripes and incorporate all colours and the details that this little fellow has.  Numbats vary in colour combinations from greys to copper so I decided to brighten the design by using the more of the earthy shades.  There are 11 colours in total and measures 98 x 74mm (3.9 x 2.9 inches) when stitched on 14 point aida fabric with stitch dimensions of 54 x 41 stitches.

Australia is indeed home to some very different and unusual animals - I guess it's what helps make us such an interesting nation and I am proud to be able to highlight our uniqueness through my work.

Ros

'We could learn a lot from crayons.  Some are sharp, some are pretty, some are dull, some have weird names and all are different colours...but they all have to learn to live in the same box' - Robert Fulghum


Monday 27 July 2015

The Finished Quilt

A little while back I posted about a new skill I was learning - quilting and promised to share photos of my finished project.  It is only just now that I realise that I forgot to take photos of the progress of the quilt construction so you will just have to bear with me while I explain the process and use the image below to refer to.  

Once all the blocks had been completed, it was necessary to choose contrasting fabrics for sashings and posts which are placed around each block and used to join these blocks together.  On my quilt you will see I chose the red fabric as a highlight for the posts and purchased a more subtly patterned fabric for the sashings.  After deciding on the placement of each block which required laying out each block and then moving them around to achieve a layout whereby the colours and patterns were evenly distributed, it was then a case of systematically sewing the fabrics together in order of rows and then joining these rows together all the time being careful to match seams and keep everything straight.

After that came the task of cutting the border which involved quite precise measuring because as our teacher explained sometimes the length of the top and bottom and both sides of a finished piece of patchwork can be uneven no matter how careful the seam allowances were sewn.  So it was important to measure in three places (top, bottom and centre for the length and left side, right side and centre for the width) and use the average measurement to cut the lengths of border.  The side borders were sewn to the patchwork first before the top and bottom borders.  It was at this point while we had our fabric and rotary cutter on hand that we cut out strips for binding and were shown how to neatly join these lengths of strips together which was very easy.  This was then put away for use at the end of the project.

The following week we were taught how to lay our backing fabric (which was yet another piece of fabric purchased) face down on the work table, place the cotton wadding over top and then final placement of our 'work of art' on top.  We all worked together on each other's quilt because it was so important that when each layer was placed on top of the other, that it was gently and accurately placed to ensure evenness with no stretching or warping and straightness was maintained.  After securely attaching all three layers to the work table with the most high-tech of devices (bull-dog clips!), we all set to the task of pinning the layers together at close intervals but not on any seams.  Pinning four quilts together took up the entire lesson but it was a most enjoyable time for us all to chat about all sorts of topics.

The following week, we were taught the technique of 'stitching in the ditch' which really is just a quilting term for stitching in the seam allowance on the lower side.  We were also shown the correct way of securing and bringing the bobbin thread to the top of the quilt so the back of the quilt was smooth with no cut off threads and whilst it took us all a little while to master this technique, it was worth it for a beautiful and professional finish.  In order to keep the quilt flat and stable and prevent any possible warping, we were also advised on the order of stiching seams ie. the inside sashing borders first, then the outside before sewing the individual blocks.  All of my blocks were sewn in the ditch to reflect the pattern on the back so I'll admit it was a long process and required patience.  The quilt needed to be rolled carefully around the sewing machine when working in an area which was quite tight, but once I could see it coming together, it was inspiration for me to keep going albeit in stages.

The following and last week of our classes involved squaring and cutting the borders evenly and attaching the binding to the edge.  Our teacher was very implicit with the technique on how to mitre the corners to give a perfectly rounded point and instructed us on a clever technique to join the ends together so the binding appeared seamless and not bulky.  It was then just a matter of folding the binding to the wrong side and handstitching a slip stitch into place to cover the machine stitching and, for me, this was enjoyably done while watching television and listening to the rain or howling wind outside.  


My quilt now has pride of place displayed over a cream upholstered chair in our lounge room and I am so happy with my efforts and the finished effect that I often look and touch it lovingly when no-one is around (sshhh...don't tell anyone).  

I am also proud to say that I have already started my next quilting project which consists of log cabin blocks in very bright colours.  But I'll leave that story for another post.

Ros

'Great works are performed not by strength but by perseverance' - Samuel Johnson

Thursday 2 July 2015

New Design Release - Gouldian Finch

I have just spent the morning, on what is a typically glorious winter's day in Brisbane, pottering in the garden and raking leaves to use as leaf mulch for the native garden.  The warming sunshine does 'something' to the happiness and agility of the body, mind and soul and it was while I was in this cheery state of mind that I thought it fitting to release a new design which reflected the mood of my day. 

I'm sure no-one would disagree with my choice of the Gouldian Finch.  This little fellow simply takes your breath away not only because of the intensity and vibrancy of colour, but the fact that it is such a dainty and sweet little thing blessed with so many colours.


Although bred in captivity nationwide, the natural habitat of Gouldian finches is in the tropical savannah woodlands across all of northern Australia stretching from the Kimberley region in Western Australia to the Cape York Peninsula in Queensland with the most prevalent area of distribution being in the Katherine region of the Northern Territory.  They live within small areas and only move when their food source of sorghum or grass seeds and/or water is scarce.  Both male and female Gouldian Finches are brightly coloured with black, green, yellow and red markings but the females tend to be a little less brightly coloured and their chest more of a light mauve in comparison to the male's purple chest. With their fully grown size only 130-140mm (approx. 5") they make ideal pets, but in the wild are in continuing decline due to habitat changes, fires and predators and the fact that they are not a particularly hardy bird and susceptible to cold and stress.

It was fun choosing the colours and variations for this cross stitch design but to replicate the Gouldian Finch in its natural beauty and achieve the desired effect it was necessary to use a total of 15 colours.  It's finished sewn size is 74 x 64mm (2.9 x 2.5in) or 41 x 35 stitches.


Perhaps what I love most about this bird is the story behind its name.  John Gould, a British ornithological artist, named this beautiful bird the Lady Gouldian Finch after his wife Elizabeth even though she did not hold the title of 'Lady'.  However in Australia reference to the title has been dropped.

Ros

 'That which is loved is always beautiful' - Norwegian proverb

Sunday 31 May 2015

A New Skill

For some time now I have been wanting to learn to quilt partly because I was keen to expand my skills but more recently I have been so inspired by the absolutely beautiful work that some of the ladies at our monthly Guild stitching afternoons do with hand embroidered blocks which are then included in larger quilts.  So, on good advice by one of the ladies who lives close by I signed myself up to do a beginner's course at our local quilting shop and bought all the necessary equipment ie. a 1/4" foot for the sewing machine, cutting mat, ruler and a rotary cutter.  The owner of the shop kindly helped and guided me with choosing a selection of 6 fabrics and explained how and why a variety of blending and contrasting colours are needed.  So with sewing machine dusted off and a pencil and folder for hand-outs, I prepared for my first lesson.

The first part of the the first class concentrated on the basics such as safe use of the rotary cutter and its use with the ruler, fabric grains, how to straighten, square and cut fabric, pressing tips and the importance of using the 1/4" seam allowance measurement to ensure precise joining when sewing all seams together so they align perfectly.


The block on the left - called simply a 9 piece block - was our very first attempt and as you can see consisted of just small squares to make a large square, but this gave us a good introduction into choice of fabrics and how placement can give totally different effects.  We were also taught the importance of order in which to sew the individual squares and then row by row and that by doing it that way it eliminated any chance of placement mistakes.  The block on the right - called Rail Fence Block - was our 'homework' and whilst it looks complicated consisted of long strips of our chosen fabric sewn, pressed, cut and then placed in criss-cross order and then sewn.  It was very important that the strips aligned perfectly otherwise the effect would've been lost.


The block for Week 2 (on the left) - Churn Dash Block - involved learning the technique of half square triangle pieces, in particular the trick to cutting and sewing on a diagonal so as not to stretch the fabric which would then of course affect perfectly matching the seams of the other squares.  Having learnt that technique our 'homework' was the Sawtooth Star Block (on the right) where two triangles were joined onto the one rectangle piece before sewing onto the other squares.  Fabric choice was important with this block so that a definite 'star' was obvious but just as important was the precision of the points of the star sewn into the seam so there were neither gaps nor overlap.  It's with designs like these that you realise how important correct seam allowance is.


Last week our block - Variable Star - extended to learning 1/4 square triangles and once again carefully choosing fabric to create the effect and whilst looking complicated, it really is just a matter of being organised and concentrating on which pieces should be sewn together and double-checking as you go along to avoid mistakes.  I was rather pleased with myself on this one as it all lined up perfectly first time.

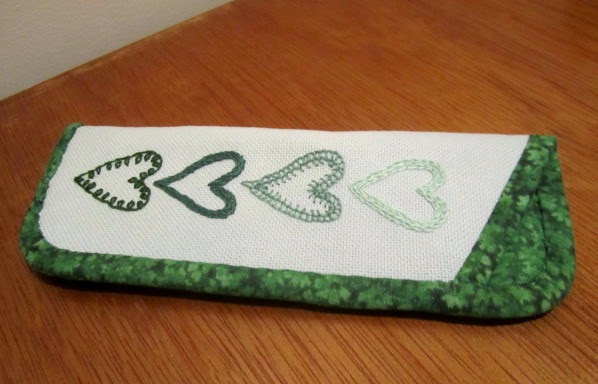
For 'homework' this week we are hand appliqueing shapes onto background fabrics using Vleisofix - which for me will be the most enjoyable of all the blocks as it involves hand embroidery and the use of blanket stitch.  There are 3 other ladies in the class and all of them don't embroider so they needed to buy embroidery needles, thread and shown how to stitch.  Our teacher knew I was an embroiderer, and when she asked me if I was right for supplies I just gave her a 'you've got to be kidding' look and politely told her that I had plenty in my stash to choose from (she had NO idea how many threads are in my threadbox).  Then with a chuckle, she facetiously asked me if I wanted a quick lesson in how to do blanket stitch to which I replied that I thought I'd be alright!! 


Last night I chose fabrics from my dwindling supplies, cut and pressed the shape for applique on background fabric and agonised over which shades of thread to use.  This afternoon and evening I plan to thoroughly and leisurely enjoy my Sunday by stitching and sewing this last block together.  Next week we begin assembling all the blocks and so I'll post at a future stage on the progress of my beginner's quilt.

But for now, please excuse me - I have 'homework' to do.

Ros

'The difference between try and triumph is just a little umph' - Marvin Phillips


Monday 11 May 2015

Spectacular Gifts

Firstly, let me say I hope every Mum had a wonderful Mother's Day yesterday and thoroughly enjoyed special time with their children and families.  I'd like to thank my husband and son who went above and beyond call of duty to design and build me a mobile trolley for a herb garden for our back deck.  Not only can it can be wheeled in and out of the sun and placed in a protected area during storms and folded up for compactability but has been designed so the plants can be placed on a lower shelf at night and covered with shadecloth to deter pesky possums with a culinary taste for parsley and coriander.  The day was finished with a family dinner shared with my Mum and daughter at our favourite local Chinese restaurant - all in all a lovely day.

A few weeks ago I set to work to make a couple of gifts as my contribution towards the Guild's Mother's Day Craft Fair gift table.  


These spectacle cases were quick and easy to stitch with the added bonus of using fabrics from my stash for the finishing process.  


This floral design used lazy daisy stitches for the flowers, french knots for the centres, satin stitch for the leaves and chain stitch for the heart.


With this design, the effect for the top three hearts were each stitched with two rows of stitching using chain, blanket and stem stitch and the bottom heart using a single row of petal stitch.


For this spectacle case I extended the contemporary design to cover the fold and part of the back and by using just stem stitch in colours complimentary to the fabric achieved an effect which I was very happy with.   

All cases were lightly wadded and bound in self-fabric with a slip-stitch finish and small enough for just reading glasses not larger sunglasses.  Spectacular, wouldn't you say!

Ros

'Creativity is piercing the mundane to find the marvellous' - Bill Moyers

Sunday 26 April 2015

Sunny Days and Auntie May

We have woken this morning to a glorious and cloudless day thanks to strong, gusty winds from the southern parts of the continent.  It's caused the temperature to drop giving a true indication of the impending cooler months, but that didn't stop me this morning from donning an extra layer of clothing and going outside into the fresh air to tend to my garden and do a spot of weeding.  It was while I was on my hands and knees happily soaking up the warm sunshine that I thought of my Auntie May who loved spending time sitting in the sun - albeit with a fresh cup of tea and her latest craft project.  

For anyone who has read the 'About Me' page on my website will know that Auntie May was a very special person in my life.  As a country lady, she never, ever had idle hands.   Her family were priority but she was also very involved in the community and church with activities where baking, sewing and gardening for charity fairs and helping the sick and elderly were commonplace.  She was the epitome of kindness and loved nothing more that a good conversation.  So it came as quite a shock and with so much sadness when Auntie May was diagnosed with Alzheimer's disease which subsequently required her being placed into Aged Care.  

Whilst in Aged Care, I continued to send her cards for her birthday (by now I was sending her stitched cards) which my cousins tell me she admired and proudly showed everyone even though, sadly, she couldn't remember me.  It was the brainchild of one of my cousins to display these cards into a framed work of art so it could be placed on the wall and thereby help make her room look 'homey' and something which gave her much happiness.


Now, these designs have come from various sources, some of which I can't exactly recall.


This tulip design was a 'freebie' from a craft magazine and definitely one of my earlier attempts.  The kit included the threads and the pattern consisted of only full cross stitch, backstitch and leaf detail - very straightforward.


I think this dahlia design might have been from a cross stitch magazine and I would've been drawn to the shade variation of the flower and the interesting detail of the leaf edges.  It also looks as though there were a few half cross stitches and by that stage comfortable enough with my work to stitch a signature into the design.


Ahh..the teapot.  If Auntie May wasn't drinking a cup of tea, she had the kettle on boiling ready to make a pot and so I knew that this design would certainly resonate with her.  I believe this pattern was in a tear-out craft section of an old edition of the Australian Women's Weekly.  I just used threads from my limited stash and can remember feeling quite clever that I'd been able to co-ordinate the shading of the colours so well with what I had and I was obviously experimenting with techniques too because around the teapot lid and knob have been stitched small white beads. 

It is indeed a great pleasure to have given Auntie May enjoyment from work that she once derived so much satisfaction from herself.  And I can just imagine she would have scrutinised my stitching rather carefully ..... while sitting in the sunshine and drinking a hot cup of tea, of course.  

Ros

'God looks after those who help themselves and God look after those who do help themselves' - Auntie May

Friday 10 April 2015

Design Release - Blue Surgeonfish

The weather has finally started to cool down with the change of season into Autumn and the mornings and evenings taking on a definite drop in temperature.  I can't tell you how wonderful it is to be able to snuggle and cosy up underneath the doona in the early hours of the morning instead of having to keep the aircon or fan going all night in order to be able to get a decent night's sleep and be fresh for the day. 

But whilst the southern parts of Australia experience autumn and winter considerably more severely than here in tropical Queensland, the northern parts of Australia hardly experience winter at all with their days being absolutely beautiful and balmy.  It's a perfect time of year to visit the Great Barrier Reef and explore its many wonders with no threat of cyclones or severe storms and it's here that you will find the subject of my new design - the rather quirky but delightful Blue Surgeonfish.


Quirky because of its unusually shaped flat body, markings and pointed snout-like nose and delightful because of its intensely exquisite colourings.  You may also recognise this particular fish as the lovable 'Dory' in the popular animated movie 'Finding Nemo' with the frustrating short-attention span and forgetful memory who befriended Nemo's father on his journey to find his son.  Blue surgeonfish (which incidentally goes by a few common names depending on the species) inhabit coral reefs, are found living in pairs or small groups and grow to a length of 30cm (12in) and have the ability to be able to disguise themselves by becoming semi-transparent when faced with danger.  They are also believed to be one of the most common and popular aquarium fish.  


It was a joy to be able to use so many bright colours (8 in all) for this design and to capture the subject in its natural environment of coral.  With the design consisting of mostly full cross stitch, it is quick and easy to complete and ideal for anyone - young or old - who has a particular interest in fish.  

Maybe just having a soft spot for 'Dory' would be justification enough to enjoy stitching this design.

Ros

'A man is happy so long as he chooses to be happy and nothing can stop him.' - Alexander Solzhenitsyn

Monday 23 March 2015

Kirsten's Wedding

It's been a rather exciting time in our family of late and in particular on the weekend just passed.  My daughter Claire had been asked by her very good friend, Kirsten, to be her Maid of Honour at her wedding.  Let me just point out that these two girls have known each other for 25 years since they were 5 and 6 months old when Kirsten's Mum and I began attending the local playgroup.  They became fast friends and continued on life's journey together through Preschool, Primary School, High School and beyond sharing many, many activities, common interests and special times.  

And it was because they spent so much time together with Kirsten coming over to our place for after school playdates, sleepovers and such and likewise Claire going over to her place that they almost became like 'second' daughters in the other's house.  It was for this special reason, that I decided to stitch Kirsten a beautiful memento in the form of an afternoon tea tablecloth that she could have as a keepsake.


Kirsten is an interior designer with an artistic and creative flair so I wanted the chosen design to reflect her personality.  I also wanted a modern and colourful, yet feminine, design and searched through lots of books and magazines until I found one which I was happy with.  After discovering the perfect tablecloth to match her chosen colour theme I then decided on threads of orange, pink and purple variegation and white for the roses and a lovely forest green shade for the ivy leaves and stem.


Because the design was going to be placed in a corner I needed to make a complete corner pattern which involved tracing from the original pattern for one side of the corner and then flipping the tracing paper over to obtain the reversed angle for the other side of the corner.  This new complete pattern was then traced onto each corner.


I experimented with a few different stitches but in the end used stem stitch for the roses and ivy leaves, stems and veins and for the main stem used row upon row of stem stitches which gave a rather beautiful raised and thick textured appearance which actually helped balance out the overall design.  

I wasn't present when the bride opened her gift which had been carefully ironed, folded and wrapped in tissue paper with a Care Instructions card included, but have it on very good authority that she absolutely loved the tablecloth and I'm sure Kirsten was very much aware of the time and effort and love put into such a special gift for such a special occasion.

With the exception of heavy rain falling between when the bridal party left the house to the time they arrived at the ceremony, everything went smoothly and perfectly.  Of course, the bride was absolutely beautiful, serene and calm and the only tears were happy tears.

Congratulations Kirsten and Nick.

Ros

'Go confidently in the direction of your dreams.  Live the life you've imagined' - Henry David Thoreau

Thursday 26 February 2015

Jo-an-Ray Update

In the post of 9 September last year about my parent's house, I promised to give an update on the progress of the two new houses which were being built on their block of land.  You may recall how it was once a humble, small two-bedroomed house that, over time, had undergone a couple of renovations to accommodate a growing family and also suffered extensive damage by two devastating floods. 


This was the family home - my childhood house - that I decided to cross-stitch for my parent's 50th wedding anniversary - the house that they had spent all their married life in.  It was sold after the 2011 flood and demolished to make way for two very contemporary styled houses.

Well today my Mum and I were in the area and drove past the newly finished houses and were wonderfully surprised.  We realise the whole suburb is undergoing a demographic change with very modern houses being built and squeezed onto smaller blocks against the much older and characteristic Queenslander styled houses on larger blocks and for the most part it all works well together.  


These houses might stand out against the older smaller houses close by, but are really beautiful in design and presentation.


Visiting the site today made me realise how very pleased I am that all those years ago I made the effort to stitch a keepsake of the family home that once occupied that block of land as there is absolutely nothing remaining (trees, fence, driveway, etc.) as a reminder.  But when I took my Mum back home to her retirement unit, the framed cross-stitch of the family home on the wall greeted us ... and it was a wonderfully warm feeling.

Ros

"What lies behind us and what lies before us are tiny matters compared to what lies within us" -Ralph Waldo Emerson 

Saturday 24 January 2015

New Design Release - Australian Pelican

In conjunction with Australian Day celebrations this weekend, I am delighted to release a new design which is symbolic of our Australian outdoor lifestyle.  Whether swimming at the beach or boating or fishing on or near lakes, the Australian Pelican can be a tranquil sight when spotted gliding on the water early in the morning or at dusk but equally as noisy and displaying flamboyant behavioural patterns when in flocks.   When the country experiences monsoonal rains and flooding of salt lakes in arid inland Australia - which coincidentally is happening at the moment - many pelicans will take advantage of these conditions and flock in their thousands to these locations to breed. 

The Australian Pelican is the largest of eight (8) species of pelicans throughout the world which can live to between 10 and 25 years in the wild.  They are found widespread over the continent and are quite capable of travelling long distances for suitable water, food and breeding grounds which can range anywhere from mudflats to beaches and reefs of inland and coastal waters.  Their diet consists mainly of fish but they will also feed on insects and aquatic crustaceans and sometimes work in groups to drive fish to shallower water.  But probably the most unique feature of the Australian Pelican is its pink elongated bill which is considered to be the longest of any living bird.  It is used as a pouch to collect food and water and has a sharp serrated tip on its beak to grip slippery fish before wedging and holding it into the bill and swallowing.


Recently, just after Christmas my family took a short break to the beach at Bribie Island (about an hours drive north or Brisbane) and as we drove over the iconic wooden bridge spanning the mainland to the island, were greeted by these beautiful creatures sitting atop wooden posts acting almost like sentinels and welcoming us.  It inspired me to get out my sketching pad again and put needle and thread to work.


The cross stitch design has 11 colours and is 49w x 37h (89 x 67mm/3.5 x 2.6in) in dimension.  The light sandy ocean effect has been depicted by using double strand pale blue and pale green thread. 

I was very pleased with how this design stitched up and I'm sure it would appeal to anyone who loves the beach or fishing.  It certainly makes me want to visit Bribie Island again.

Ros

'Remember day by day, to scatter seeds of kindness as you pass along the way' - Ella Wheeler Wilcox